How to sew a cell phone bag | diy cell phone bag | diy phone pouch easy sewing tutorial.
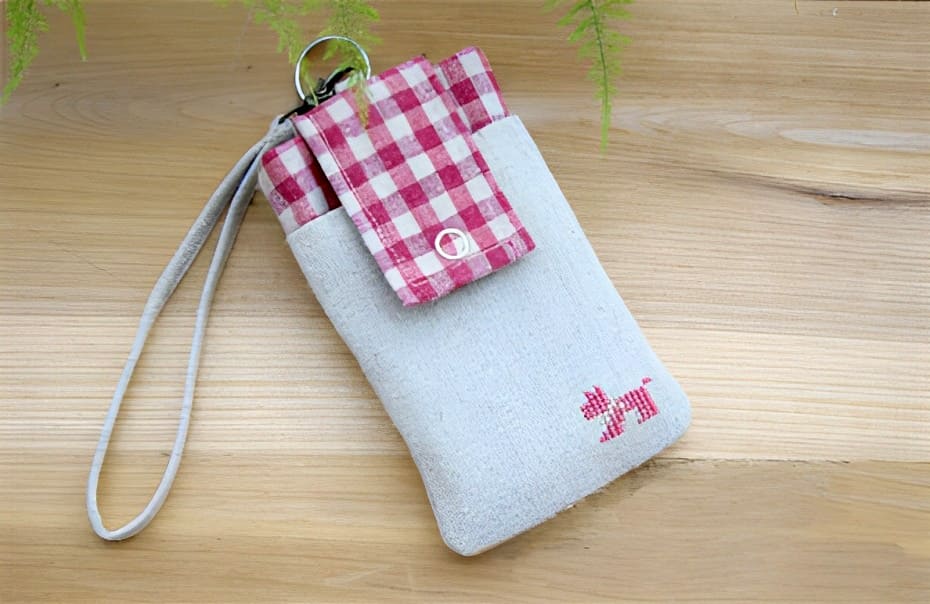
This small bag has 3 pockets in the front and back, the big pocket in the middle can hold not only cell phone, but also ultra-thin digital camera, PSP and so on, of course, you can make it to the size you need, the finished size of this example is → 13.5cm * 8.5cm
In order to let you understand the whole process more clearly, we will explain each part of the bag separately.
Making the Buckle Tabs
1. Cut a 10cm x 10cm piece of fabric, iron on a layer of fusible interlining on the reverse side to strengthen the thickness, and then fold it over and sew it together to form a tube.

2. Separate the seams and iron them flat, then let the seams be centered and sewed to one end of the tube, after sewing, trim off the two corners of the seams and turn out the front side, iron the edges and press a circle of bright lines; in addition to making a small band about 1cm wide and 4-5cm long, and of course, can be used nowadays webbing, to be a little more solid, which will be used to set the key ring and buttons→.

front of the bag
Usually when you make a bag, you make the main and inner part separately. Here we are trying to connect from the inside and divide the front and back parts according to the manufacturing method. First of all, let's make the front of the bag.
1. as shown in the figure below size cut two pieces of fabric, a long piece of cloth used to do the front of the bag table cloth and lining, a short piece of the front of the pocket, but also the surface cloth and lining cloth connected to a piece of the cut →

2. The center of both pieces of fabric will serve as the pocket opening, so it is best to iron on a layer of fusible interlining to set the shape. In this case, the fabric used is hard linen, so only a thin layer has been ironed on. If thinner fabrics are used, consideration should be given to ironing on a fusible interlining on all the halves that will be used as a surface fabric.

3. Fold the fabric for the pocket and align the bottom edge of the other piece of fabric, sew a circle around the 3 edges to secure it, and end the production of the front piece.

The back piece
1. The back piece is to be installed in the pocket tabs, so you can not be lazy to cut the surface fabric lining fabric together, since the separation, the height should be more than the front of a sewing portion, the width and the front of the same. First cut the back piece of the surface fabric and lining, the size is the same, here we are still missing a piece of zipper pocket fabric, it will be in the process of sewing the zipper to cut →

2. We're going to put a zipper in the back by cutting horizontally 5.5cm from top to bottom on the tablecloth→

3. First of all, sew the lower part and the zipper together, when sewing, please use a 1/4 inch seam allowance (the width of the universal zipper is 1 inch, using a 1/4" seam allowance can make the height of the bag after sewing the zipper and the original height is the same), after sewing, don't forget to lock the edges→.

4. Now, the height of this lower part with the zipper is the height of the pocket fabric we want to cut, cut a piece of the pocket fabric can be →

5. Lay the bag fabric at the bottom, center the zipper, and sew the top half of the fabric together with a 1/4" seam allowance, no need to lock the edges here.

6. Lift up the upper part, the bottom of the zipper, cloth, bag cloth together with sparse sewing a circle →

7. Next, the tablecloth and the lining should be connected. Before that, the prepared tape should be folded in half and fixed in the center of the upper edge of the tablecloth, then the buckle tabs should be added, and the lining should be covered and sewn together.

8. After the production is completed →

the front and back are connected
1. Trim the four corners of the front and back pieces to the same rounded shape.

2. The table cloth to the table cloth end, the lining cloth to the lining cloth front face inward aligned sewing a circle, return to leave 6 ~ 7cm in the lining cloth side, after the completion of the curved rounded corners of the cut several tooth →

3. Turn out the front, sew the opening in the lining, and insert the lining into the tablecloth.

4. Nail the buttons. First pin the half on the button tab, then fold the tab down about 1 cm above the pocket opening, mark the corresponding position of the button, and then pin the other half. If you fold the tab down along the pocket opening, the button will not be fastened when the pocket is stuffed to the gills→

This example uses a five-jawed clasp, note that the five-jawed clasp does not apply to too thick a place →

5. Finally, attach a key ring and a strap with a lobster clasp to the buckle at the back for easy hand-carrying. Again, the strap can be made using today's webbing, and the length adjusted to allow one hand to pass through.


0 comments:
Post a Comment