
Materials
Main fabric (This is the bottom ruffled portion): approximately ⅓ yard
• 2- 21 ½” X 10” pieces
First Coordinating Fabric (This is the top band): approximately ⅛ yard • 2- 4 ½” X 13 ½” pieces
Second Coordinating Fabric (This is for the ruffles): approximately ¼ yard
• 1- 3” X 45” strip
• 4- 1” X 45” strip
Lining Fabric: approximately ⅔ yard
• 2- 19” X 10” pieces (to be trimmed down later)
• 2- 4 ½” x 13 ½” pieces
• 1- 12” X 5” piece (for the lining purse bottom)
Purse Bottom (I used vinyl/ fake leather; however feel free to use whatever fabric you wish.):
• 1- 12” X 5” piece
Other Materials:
• 55” of 1 ½” webbing
• 4- 2” grommets
The fabrics I used are quilting weight cottons. Try and experiment with other types of fabric. However, keep in mind you want a nice drape for the bottom ruffled potion so heavy fabrics are less likely to drape as nicely.
Notes on Interfacing
Interface the exterior bottom ruffled portion (the 21 ½” X 10” pieces) and the top bands (the 4 ½” X 13 ½” pieces) with a light weight interfacing (Pellon Shape-Flex 101 would work). This allows the fabric to drape nicely.
Interface the lining pieces (the 9 ½” X 10” pieces and the 4 ½” x 13 ½” pieces) with a medium weight interfacing (I used Pellon Décor Bond). This will give the purse shape and strength without interfering with the drape of the ruffled potion. The ruffles do not need any interfacing. For the purse bottom I used two layers of heavy weight interfacing (like Pellon Peltex) for strength and support.
These are only suggestions, try and experiment with other interfacings as well!
Instructions
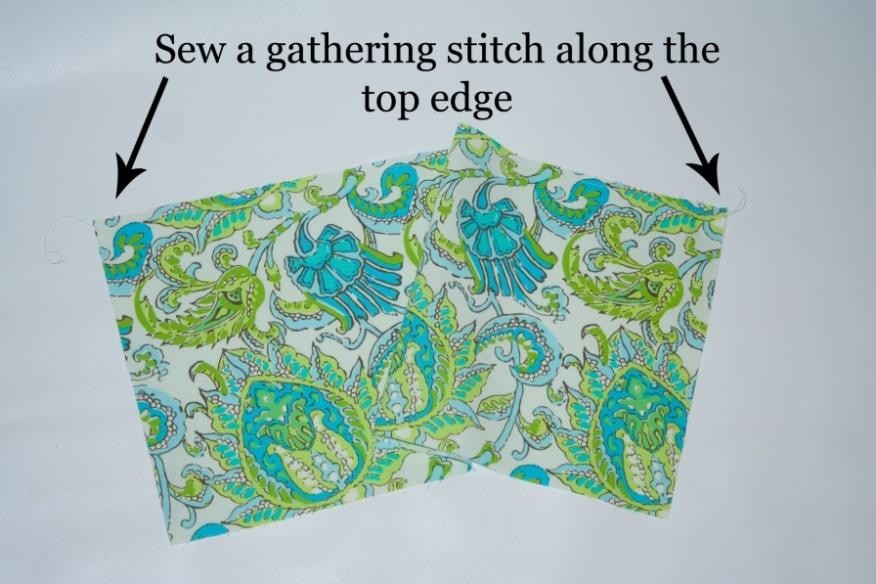
Sew a gathering stitch across one of the long edges of the bottom ruffle panels (the 21 ½” X 10” pieces).
Carefully pull the threads to gather. Gather the fabric until it is 13 ½” long, or until it matching the long edge of the top band.

With right sides together sew the bottom ruffled portion to the top band with a ½” seam. Open and press flat. Repeat the previous steps with the remaining ruffle panel and top band so that you have two complete main pieces.

Take the 3” X 45” ruffle strip. Fold in half lengthwise, with right sides together, matching the long edges. Sew a ¼” seam along the long edge, forming a tube.

Turn right side out and press so that the seam is in the middle.

Using a ruffler attachment or a gathering stitch, ruffle the strip, sewing down the center of the strip. The ruffled length should be approximately 27”. Cut the strip in half so you now have two 13 ½” strips. (Note: If ruffling with a gathering stitch it may be easier if you cut the 45” strip in half and THEN ruffle each piece to a length of 13 ½”.) Place the ruffled strip over the top of the seam between the top band and the bottom ruffled portion. Sew in place, sewing over the previous stitching line.
Repeat with the remaining ruffle strip and main body piece.

Place the two main body pieces right sides together, matching the side seams. Sew a ½” seam along each side.

Sew two separate gathering stitches along the bottom. One along the bottom of each main body piece.

Carefully pull threads to gather the bottom.

On the bottom of the main panel, match the side seams to the middle of the short
edge of the purse bottom and pin.

Continue to pin the bottom of the main body panel to the purse bottom with right sides together. Gather or ease the gathers until they match and fit the bottom piece. Check to ensure the gathers are even. Sew a ½” seam around the bottom piece.


Take the 19” X 10” lining pieces. On one of the long (19”) edges measure in 2 ¾” in from each end and mark. Draw a line from the 2 ¾” marks to the bottom corner of the opposite long edge. Cut along these lines. This forms a trapezoid shape. Repeat for remaining panel.

Match the 13 ½” edge of the lining piece to the long edge of the top band.
Sew a ½” seam.

Press open. Topstitch along the top edge of the seam, if desired. Add any pockets desires. Install your magnetic snaps if you are using them.

Place the two lining pieces right sides together, matching up the side seams. Sew a ½” seam along each side.

Sew a gathering stitch starting 1-2” from one of the side seams and stopping 1-2” on the other side of the side seam. Repeat with the opposite side seam. Carefully pull the threads to slightly gather.


Again, match the side seams to the middle of the short edge of the lining bottom and pin. Like before, Continue pinning and adjusting the Gathers along the side to ensure the pieces fit properly.

Sew a ½” seam along the bottom, leaving an approximately 3” hole along one side.

Place the exterior body inside the lining body matching right sides together. At the top, match the sides seams of the exterior and lining. Continue to pin along the top edge.


Sew a ½” around the top. Turn right side out through the hole in the lining bottom. Press along the top edge.

Topstitch along the top edge of the bag.

Install the grommets. Place one of the grommets approximately ¼” from the top and ¾” from one of the side seams. With a pencil, draw a circle along the inside ring of the grommet. Carefully cut along the circle, through both layers. Install grommets according to directions.

Take two of the 1” x 45” ruffle strips and sew them together. Serge the edges of the strips to prevent fraying (or leave them if you like the frayed look).

Ruffle the strips (either with a ruffler or using the gathering stitch). The finished length after ruffling was roughly 40”. Repeat these steps so you have two ruffled strips. Cut the webbing into two 27 ½” pieces. Feel free to adjust the handle length to your preference.

Center you ruffled strips onto the webbing handles. Trim the strips to fit the handles. Tuck the raw edge of the strip under ½”. Sew the ruffle to the webbing sewing over your previous stitching line.

Loop the handles through the grommets. Match the wrong sides of the handle just above the bag. Sew across the handle to secure.
Tip: If you are using polypropylene webbing, you can “seal” the edges so they won’t fray. Simply iron ONLY the edge of the webbing for a few seconds. It will slightly melt the edges so they won’t fray. Be careful however, it will melt if you leave the iron on too long or iron other parts of the webbing.

Enjoy your new purse!!


0 comments:
Post a Comment