
This time, we worked up a trio of felt ice cream projects that serve double duty: The ice cream cookie sandwich is a gift card holder. The “Tasty Treat” ice cream carton is a gift box, and the waffle cone has a small loop so it can be tied to a gift as a present topper.

Click here to download the Free Sewing Pattern + Tutorial (PDF) for the Felt Ice Cream Projects!

Felt Ice Cream
What better way to celebrate than with ice cream? This trio of sweet treats look delicious and won’t cost you a single calorie. We love felt food, but these projects have the added bonus of being functional. This tutorial includes all of the instructions to make an Ice Cream Sandwich giſt card holder, Ice Cream Carton giſt box, and Waffle Cone present topper.
No sewing machine? No problem! This is the first of the and tutorials that can be sewn entirely by hand. We’re using fun techniques like "eezer paper templates, embroidery, and felting with the Futte Futte maker!
We used the yummy American Country Felt for this project, but any good quality 100% wool felt will do. Sewing felt can be addictive! If you like this project, you might have fun exploring some of the other felt sewing books and kits in the shop. Enjoy!


Ice Cream Sandwich
Gift Card Holder
3 3/4” wide x 2 3/4” tall
x 1” deep
Wool Felt: Brown
Embroidery Thread: Brown (Cosmo #312),
Cream (Cosmo #1000), Red (Cosmo #800)
Optional: Punching Felt (Donut) in Brown
Hand Sewing Needle
Freezer Paper and Templates on Page 10
2 Sew-On Metal Snaps (Size 2/0 or 1/4”)
Stuffing
Scissors and Rotary Cutter/Mat (optional)
Cut out the cookie pieces, cutting through both the freezer paper and felt at the same time for a nice crisp edge. Peel off freezer paper.
Cut four strips 7 1/4” x 3/8” Length does not need to be precise. See step 4.
Cut one rectangle 7 3/4” x 2 3/4”. Round the corners slightly.
Cut two rectangles 2 3/4”x 3 3/4”. Round the corners slightly.


Steps
1. Line up the punching felt along the lower right hand corner of the long rectangle. Using a 1/8” seam allowance, stitch along the sides and bottom of the punching felt to create a pocket.
2. Optional embroidery: Back-stitch your gift card message using two strands of red embroidery floss. If needed, write the words in pencil first and stitch over them. Attach the snaps on either side 1/4” away from the edge.


3. Stitch a brown cookie piece to one of the smaller cream rectangles using two strands of brown
embroidery floss. Bring thread up at 1, down at 2, up at 3, down at 4 and repeat around each of the
scallops. Decorate the front of the cookie with french knots in cream. Repeat for other side.
4. Attach two of the strips to form one long piece 3/8” wide and at least 13 1/2” long. Repeat for the
other set of strips.

5. Attach a strip of felt to one of your cookie pieces, whipstitching the felt strip to the cream layer. Take care to insert your needle through the cream layer only. You do not want these stiches to show in
your cookie’s crust. When you reach the beginning, cut away any excess length and stitch the ends of the strip together. Repeat for the other cookie.


6. Place the long rectangle on top of one cookie exterior. Line up the outside corners and whipstitch in place. Leave a 1 1/2” gap along the bottom to insert stuffing.
7. When you reach the middle seam, fold the long rectangle in half. Continue your whipstitching along
the folded edge. If you are using a high quality wool felt, you can make these stitches invisible on the
other side by not piercing the felt all the way through.

8. Repeat for other cookie half. Insert stuffing and whipstitch the gap closed. You are finished!


Ice Cream Carton Gift Box
Wool Felt - Brown
Wool Felt - Sky (pale blue)
Wool Felt - Latte (tan)
Hand Sewing Needle
Scissors and Tape
Embroidery Thread - Brown (Cosmo #312), Cream (Cosmo #1000),
Sky (Comso #522), Latte (Cosmo #307)
Freezer Paper and Templates
Carton template: Cut two (2) in Sky.
Stripe template: Cut five (5) from Cream felt.
Lid template: Cut one in Cream and one in Latte.
Base template: Cut one in Cream and one in Latte.
Label template: Cut one in Brown.
Cone template: Cut one in Latte.
Scoop template: Cut one in Sky and one in Cream.
2. Using the templates on page 10, cut one Carton, Lid, and Base piece out of
cardboard following the DOTTED lines.

3. Cut a strip of cardboard 1/4” wide x 9 1/2” long. Cut a strip of brown felt 1” wide x 9 1/2“ long”. If you need two pieces of felt to achieve this length, that is fine. Cut two pieces and stitch them together
Steps

1. Backstitch the cream stripes to one of the carton pieces. Each stripe should be 5/8” apart and
aligned along the bottom edge.

2. Trim any excess felt that hangs over the top edge of the carton.

3. Backstitch a dotted line around the edge of the label using two strands of cream embroidery floss.
Whipstitch the ice cream cone to the label. Backstitch the words “TASTY treat” using two strands of cream and blue embroidery floss.

4. Backstitch the label to the front of the carton.
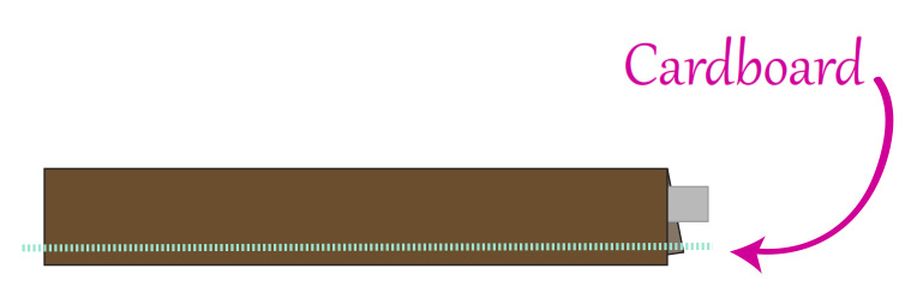
5. Wrap the brown felt strip over the cardboard strip and stitch along the dotted line.

6. Stack the lid pieces (cream felt, cardboard, and tan felt) and whipstitch around the edge. Repeat for the base.
7. Whipstitch the brown felt strip around the circumference of the lid lining up the folded edge to the cream side of the felt. Your goal is to create an overhang so the lid will sit on top of the ice cream carton. When you reach the beginning, cut away any excess length and stitch the ends of the strip
together.

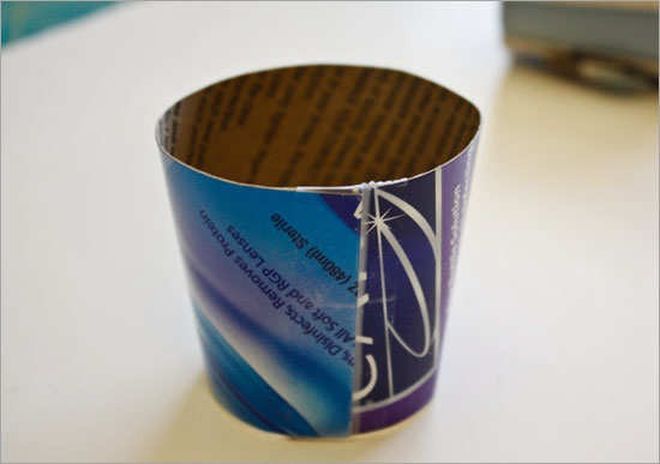
8. Wrap the carton into a column. Overlap the edges as needed so that the carton will be the
correct size and shape for your lid and base. Whipstitch the sides of the carton together.

9. Wrap the cardboard carton piece into a column and slip inside your carton exterior. Measure how much cardboard will need to overlap to fit snugly inside. Remove the cardboard, trim away any excess, and tape in place.

10. Layer the remaining piece of Sky felt into the carton so that your cardboard layer is concealed
between the two layers of blue felt. Make sure the the carton pieces are aligned neatly at the bottom.
Whipstitch the two layers of felt together along the top opening.

11. Turn the carton upside down. If needed, push the cardboard piece inside a little, so that there is at
least 1/8” of clearance from the bottom edge. Whipstitch along the bottom opening. Whipstitch
the base to the bottom of the carton using blue thread. You are finished!


Waffle Cone Present Topper
Wool Felt - Brown
Embroidery Needle & Doll Making Needle
Scissors and Sewing Pins
Freezer Paper
Templates on Page 10
Optional: Futte Futte Felt Ball Shaker
Optional: Hand Felting Needle
Optional: Hand Felting Thimble
Wool Roving (pink, mint green)
Hot Water and Dish Soap
Embroidery Thread -
brown (Cosmo #312), tan (Cosmo #307),
& assorted colors for sprinkles

Cutting
1. Using the templates on page 10 and the freezer paper instructions found on page 2, cut out one Waffle in Latte (tan) felt and one Chocolate in brown felt.
Steps
1. Stitch sprinkles onto Chocolate piece using two strands of embroidery floss in assorted colors.
Backstitch vertical lines on the Waffle piece in brown thread.

2. Backstitch horizontal lines on the Waffle in brown thread. Whipstitch Chocolate to the Waffle along curved edge.

3. Take a piece of wool roving and divide. Cut the wool roving into short pieces and fluff. Place in the
Futte Futte Maker.

4. Prepare a tub of hot water. Using the measuring spoon provided add dish soap.
Swirl the shaker around in the soap, then take it outside and shake, shake, shake. Repeat for the second color. Let felt balls dry.

5. Wrap the waffle cone around one of the felt balls to determine where the cone should overlap. Secure with a pin and stitch in place. 6. Optional: Use the hand felting needle to felt the two scoops together. Don’t forget your thimble!

7. Thread your doll making needle using a knotless start. (Create a knot about 1/2” down from the looped end. Insert the needle through the felt balls and down through the center of the waffle cone, securing with a knot at the base. You are finished!


0 comments:
Post a Comment