

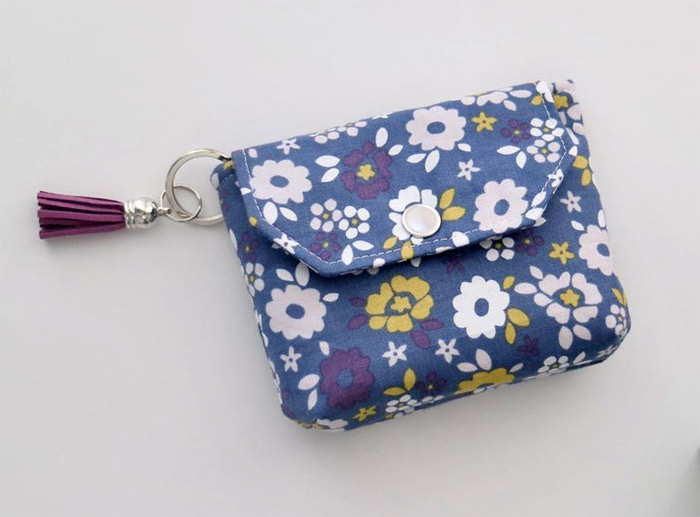
• 1" (13.5mm) Split Ring/Key Ring
• Metal or Resin (Kam) snap
• 3/16" Eyelet kit with tool (optional)
• Two quilting weight cotton or canvas fabrics (minimum 10 inches tall by 11 inches wide each)
• Fusible Fleece
• Medium weight fusible interfacing
A 1/4" seam allowance is used for this pattern. Topstitch and baste
with a 1/8" seam allowance.

Prepare Your Fabric
Place paper templates on fabric and trace around them. You will need two
exterior fabric pieces, two for the lining fabric and two for the flap. Cut out the
darts on the fabric.
2.5" square of exterior fabric for the keyring (if not using an eyelet)
Fuse fleece to exterior fabric
Fuse medium weight interfacing to each flap piece (Fig. 1)
Take your two lining pieces and cut away 1/4" from the top straight edge. This stops the lining from "bunching" up inside the pouch. (Fig.2)

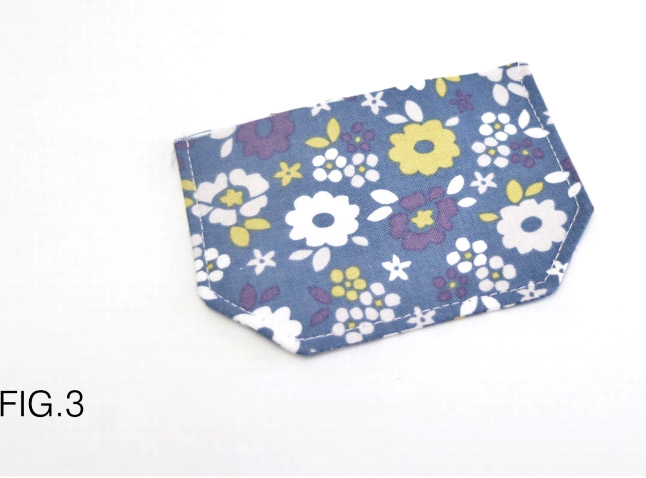
Place flap pieces right sides together and sew along the sides and bottom, leaving the top open. Clip the corners and turn right side out, press.(Fig.3) Topstitch 1/8" from the edge on the three sides. Set aside.
Take your exterior and lining pieces and fold the darts right sides together, sew darts together with a 1/4 inch seam allowance on all 4 pieces. (Fig.4)


*lf you're not using the eyelet option for attaching the keyring, take your 2.5" square of outer fabric and fold in half, press with iron. Open up and fold edges in to meet in the middle crease, then fold in half on that crease. Topstitch around. Take your key ring and fold the fabric tab in half around it. Measure 1" down from the top edge of the front outer piece and baste in place. (Fig.6)

Place exterior pieces right sides together, nesting the darts (Fig.7) sew the sides and bottom leaving the top straight edge open. Repeat with the lining pieces.
Turn the lining right side out and place inside the exterior piece, ensuring the right sides of the fabric are facing. Leave a 2 inch gap in the front of the pouch (not on the flap side) for turning. Sew around back stitching at beginning and end. (Fig.8)
Turn right side out. Leave the gap open for snap installation.


The flap is approximately 4 inches wide so measure 2 inches in from the edge and 1/2" up from the bottom to center the snap. After you have installed the flap snap, close the flap and mark on the front of the pouch where the corresponding snap will be placed. Install bottom snap.
Fold the raw edges in and press with an iron. You can topstitch around the edge of the pouch to close the opening but because of its small size, this can be tricky so you can handstitch the opening closed or gasp!..use some fabric glue.

Eyelet Installation:
Refer to the picture (Fig.9) for placement. I place mine on the back side of the pouch. I trace around the eyelet, then place a small hole with a metal awl and slowly make the hole bigger with a small pair of scissors. I recommend practicing on scrap fabric if it's your first time installing an eyelet. Once your hole is large enough install the eyelet according to the instructions on package. Now all you have left to do is slide on your keyring and add a cute tassel or charm!


Amei! Obrigada! Linda peça e muito útil!
ReplyDeleteGracias. Muy práctico.
ReplyDelete