
Clasp frame purses are in a class of their own. So classy, yet so timeless—and oh so stylish! But aren't they just so hard to make?
NOT! They're actually quite easy. So easy you can easily make them as gifts and pass them off as expensive luxury gifts. Read on!

Some of which were the regular round-corner purse frames.
And then there were those rectangular ones where the fabric only attaches to the top bars of the frame. (see below) They seemed significantly harder to make at first. I was searching and searching and couldn't find any tutorials or good examples. So I made my own little design for it instead and I think it turned out really well. I love the bag!
So here are steps to share with you on how I did it. Keep in mind that's just the easiest way I figured to make it, but if there are better/other ways, I'd love to hear it!


The bag is seamlessly lined inside. A shiny satin lining will make it look all nice and fancy. A lush velvet material would be sweet too.

The sides of the bag is creased in such a way that it retracts inside when bag is closed, like a paper bag, essentially. The metal frame at the sides do not attach to the fabric. The only attachment of fabric to frame is at the top opening.

Materials
Pretty fabric for the outside (1/2 yard is plenty, you need a long but narrow piece, it depends on your frame size)
Lining fabric for the inside (same as above)
Fusible light-midweight interfacing for extra weight if your fabrics are on the thin side
Heavyweight stabilizer, such as Timtex (you want the real stiff and thick kind)
A rectangular purse frame, of course
Fabric glue with a narrow tip (I used a common brand called Unique Stitch with good results)
A few binder clips to help hold frame in place while glue is drying
Measurements
Here's some simple arithmetic to calculate how big your fabric cuts should be. Write down each of the measurements corresponding to each letter.
A = Width of your bag frame. Mine was 7.25" wide.
B = Height of bag desired. Mine was 4.5" tall.
C = Depth of bag desired. Mine was 2.5" deep.
Final fabric dimensions:
Width to cut = A + C + 1"
Height to cut = (2 x B) + C + 1"
Use these dimensions for your outer fabric, lining, and interfacing. So for example, my fabrics were cut to 10.75" width x 12.5" height.
Final stabilizer dimensions:
Width = A
Height = (2 x B) + C
Use these dimensions for your stabilizer. So for example, my stabilizer was cut to 7.25" width x 11.5" height.
Sew it up
For all steps, stitch with a 1/2" seam allowance, unless otherwise noted. Backstitch the beginnings and ends of all stitches.
Step 1
Cut fabrics and interfacing, if any. If you're using interfacing, apply interfacing to the wrong side of either/both your fabrics according the interfacing instructions.
Fold the lining in half, widthwise, right sides together (so the wrong side is on the outside). Pin one short edge together and stitch with a 1/2" seam allowance. Repeat for the opposite edge.


It should now look like the above.
Step 2
WIth a fabric marker, draw a line (C / 2)" long that is (C / 2)" away from the stitching.
(C / 2)" means C divided by 2, means half of the depth of your bag. Mine was a 1.25" long mark.
Repeat for the other edge and also the other side of lining.

Pinch the corner of the bag, like how you normally make a bag bottom, keep the pinch nice and perpendicular. Sew exactly along the marks you just made. Each stitch should be as long as the depth of your bag.

Repeat for the other corner.

Trim the corners close to the stitching to reduce bulk.

Step 3
Repeat Steps 1 to 2 for the outside fabric.

Don't forget to trim the corners. By the way, that's the wrong side of the fabric you're looking at in the photos, even though it doesn't look like it.

Step 4
Turn the lining piece inside out, so the right side is facing out. Stuff the entire lining into the outside piece. Pin the lining to the outside fabric all along the upper edge, matching side seams.
Using a fabric marker, make a small mark (C / 2 ) + .25" away from the side stitching. So for example, if C=2.5", then I make a mark (2.5 / 2)+.25 = 1.5" away from the side seam. Repeat for the opposite edge and also the other side of bag.

Why .25"? Because the two side bars of the bag frame blocks the way of your fabric from entering the top bar. As you can see below. So .25" is to account for that, as you will see in the next steps.

Sometimes bag frames do not have that issue though, like this one below from 3DPatternPaper. If that is the case for your frame, then simply ignore the + .25" addition from above and just go with (C / 2).

Stitch from one mark to the opposite mark on the other side of bag, using a 3/4" seam allowance. Repeat for the opposite edge.
Stitch from one mark to the opposite mark on the same side of bag, using a 1/2" seam allowance. DO NOT repeat for other side.


Clip the fabric at all the marks close to the inner stitching, without cutting into the stitch. Trim seams at the sides down about 1/4".


View from the side
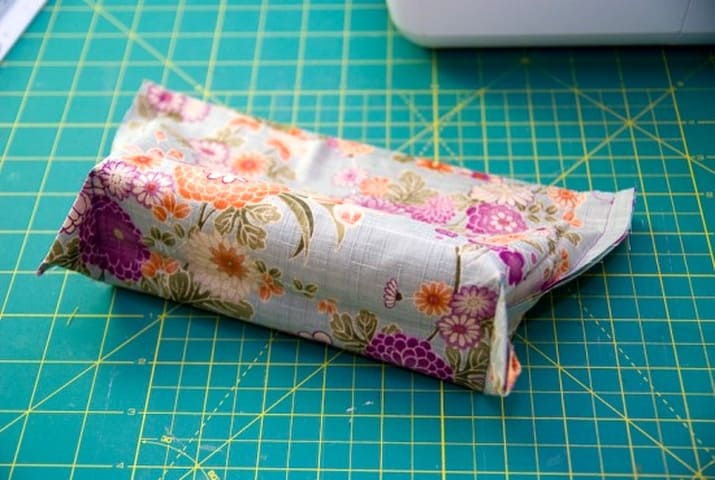
Flip bag inside out through the gap left open. Push out all the corners with the help of a pointy object.
Step 5
Cut stabilizer to the dimensions determined earlier.
If you're using a frame like mine where the side bars intrude into the top bar, clip out about a 1/4" square off each corner of the stabilizer.
If you're using a frame which doesn't, like in the sample frame photo above, then ignore this step. Proceed to Step 6.

Step 6
Fold stabilizer B" down from one short edge. Then fold again C" away from previous fold, so stabilizer resembles shape of bag. Press with iron to strengthen fold.

Stuff and ease entire stabilizer into bag. Shift stabilizer around until its corners fit into the corners of the bag. Use a few pins to hold the layers in place. Stabilizer should fit just perfectly into the bag, but the bag sides will be NOT layered with stabilizer.

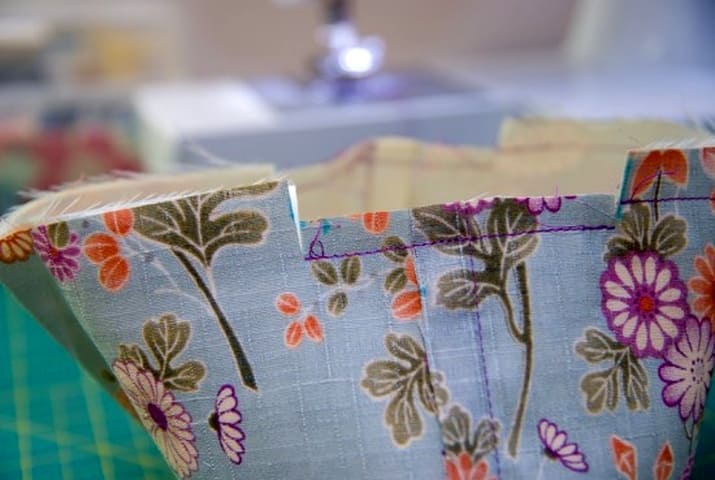
At the enclosed edge of bag (the side without the gap), topstitch close to the seam through all layers of fabric and stabilizer.

Step 7
On the opposite edge with the gap, close the gap by straight stitching through all layers of fabric (but NOT stabilizer) about 1/4" away from the edge.

Make sure stabilizer is smoothed out and its corners fit into the corners of the bag. Pin in place near the gap.
Using a wide and short zigzag stitch, sew near the previous stitches as close to the inner corners as possible, sew through all layers including stabilizer. Trim seam so that there is a 1/4" seam remaining.

Step 8
To add some crispness to the bag, topstitch the side bottom of the bag close to the edge. Repeat for the other side.


Step 9
Now for the exciting part! Bust out your fabric glue and drizzle some glue all along the groove in one of the top bars of the bag frame.

Carefully stuff one edge of the bag into the bar. Use some binder clips to help hold the fabric and frame together. Clean up any glue that may have smeared or oozed out.

Repeat for the other side.

Now go eat a sandwich, watch some tv, and come back when the glue is dried! Give the bag an all around light press with the iron to help bring out its shape. And you're done! Now take your new frame purse out for a spin! :D
Some quick notes:
The heavier the stabilizer the better. I used a pretty heavy one and I still wished my bag was more stiff.
My particular frame had a little ring at the side for attaching a wrist strap. I just added a little knot to it instead (tutorial for later). Frames come with or without the ring.
The deeper you make your bag (measurement "C"), the wider you can open the frame. My bag at 2.5" deep doesn't open very wide, but I am perfectly okay with that.
Hope you enjoy sewing this bag as much as I did!


0 comments:
Post a Comment