
In lots of my sewing projects of late I have been making my own bias binding. So today as part of my 'Sewing techniques' series I wanted to share with you 'How to cut & sew bias strips'...
What is a bias strip ? A bias strip is a woven strip of fabric cut on the bias.
The true bias refers to the 45 degree angle that intersects the warp and the weft of a woven fabric. The bias of woven fabrics offers the greatest stretch and can easily be moulded to take shape. The bias can be found when the weft is folded to line up with the warp.
Bias strips can be joined to form one long strip, which in turn can be folded to make binding or filled with cord to make piping or spaghetti straps. There are tools to help with making binding, spaghetti straps etc which I will cover later. But first you have to cut it and sew it together. Here’s how...
You will need
45mm rotary cutter
Self healing cutting mat
quilting ruler
sewing machine
iron
leaf sewing pins
How-to step by step

Step 1
To cut the bias strips you will need a cutting matt, rotary cutter and a marked quilters ruler.

Step 2
The selvedge edge, is the length and warp edge to the left and right of the fabric. The weft is the width and raw edge of the fabric at the top & bottom.

Step 3
Find the bias by folding the fabric diagonally, lining up the width grain with the selvedge edge. Right sides together.This will form a triangle. The fold is the true bias.

Step 4
Trim off the extra fabric at the bottom.

Step 5
Now you have a square of fabric folded in half to create a triangle of fabric with right sides together.

Step 6
Now, take the lower right point of the triangle and bring it up to meet the upper left point of the triangle.

Step 7
Using a ruler and rotary cutter, cut off the selvedge. You will be cutting through four layers of fabric.

Step 8
To calculate the end desired width of your binding strip... It will be about twice the finished width of the finished single fold tape. Or about four times the width of the finished double fold tape.

Step 9
Place your ruler half the width of your desired cut strip from the 2nd folded edge of the triangle.

Step 10
Using your ruler and a rotary cutter cut the first strip.

Step 11
Place the ruler the exact width of your desired cut strip away from the first cut line.

Step 12
Using your ruler and a rotary cutter cut the second strip.

Step 13
Continue placing the ruler the exact width of your desired cut strip away from the last cut line.
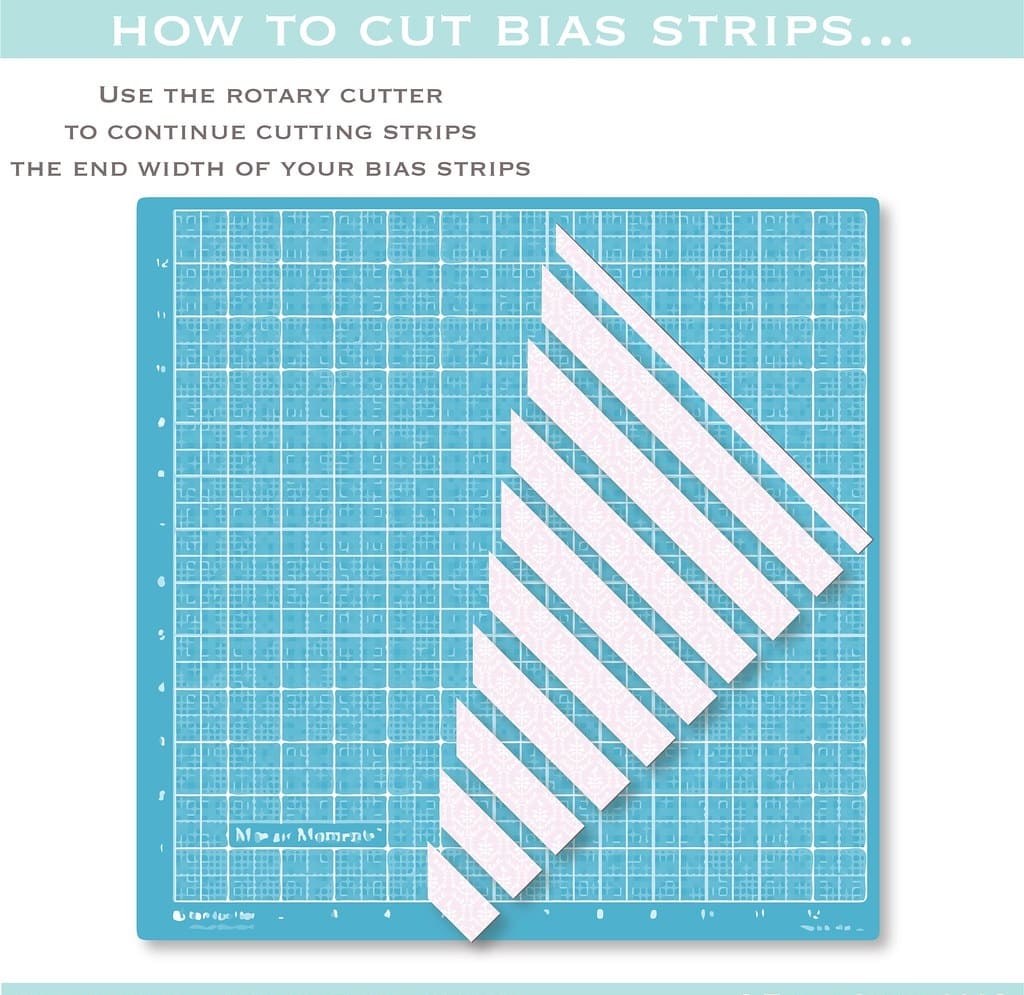
Step 14
Using your ruler and a rotary cutter continue cutting the strips the exact width.

Step 15
Except for the very first cut at the fold, you will now have two layers of bias cut binding for each cut width. Since you’ve cut your fabric on the bias, you will also notice all the strips have angled ends – perfect for piecing the strips together!

Step 16
Again, the only exception will be the very first strip you cut at the fold. Using a ruler, preferably one with a 45° angle mark, mark and cut each end of this strip to match the others.

Step 17
To stitch your binding strips together you will need a sewing machine, matching thread, sewing pins and an iron.

Step 18
Appearance of strips as they are placed before stitching. They are right side up.

Step 19
To create a long bias strip, pieces must be joined together along the short diagonally cut ends. To join strips along the diagonal edges, pin them right sides together. Offset the short ends by 6mm (1/4”). When pressed flat, the finished strip will then have a nice straight edge.

Step 20
Using a 6mm (1/4”) seam allowance stitch the short diagonal edges together.

Step 21
Press seams open. This will create less bulk.

Step 22
Trim off the little "points" with a pair of scissors.

Step 23
For smaller pieces of fabric, use the lines on your ruler as a guide. No folding necessary. Place the ruler along the 45 degree diagonal line and cut the fabric.


0 comments:
Post a Comment