
It’s a gathered skirt with scoop pockets, made out of a soft stretch knit fabric. It’s soo cute and looks like it would be plenty comfortable for playtime.
I wanted to make my 4 year old girls new skirts. I knew which fabric I would use but I didn’t want to do the shorts with skirt again but wanted another different knit skirt.
So I got out my pattern box and looked…. nothing :( that I wanted to make.
So I got on pinterest and found this picture:

It is apparently over a year old and the skirt was a skirt sold at Nordstroms that isnt even on their website anymore…but who cares! It was my inspiration!! I decided I wanted to make them a similar one.
So I set out to draft my own cute jersey skirt with pockets … and after a short time, here is what I ended up with :

These look so great on my girls!


And have pockets to carry stuff around in:

The size that I made for my girls is a 4T. Their waist measurement is 22″. …The desired length of the skirt was 11″. So I will give you those measurements BUT the skirt can be made easily for other sizes too. Below is exactly how I would make this skirt for my older daughter in her size. (I may even make one for me!!!! If I do, you will be the first to find out! :) ) You just have to know two measurements – waist and desired skirt length.
I had to cut the following pieces (these include the seam allowances given throughout the tutorial)
- 2x rectangle of main fabric for front and back of skirt (waist +1″ x length + 1/4″)
- 2x pocket piece of main fabric (click here to get the two pattern pieces you need)
- 2x pocket piece of contrast fabric
- 1x waistband (waist – 1″)
- 1x elastic (waist – 1″)
For a 4T, this would be:
- 2x rectangle of main fabric for front and back of skirt = (23″ wide x 11.25″ long)
- 2x pocket piece of main fabric
- 2x pocket piece of contrast fabric
- 1x waistband = 21″ x 3″
- 1x (1″ wide) elastic = 21″ long
DOWNLOAD PATTERN

So, I said my girls love this skirt… why?
because of the pockets:

Pockets make it seem much harder to some beginners but you will see it is actually quite easy to make these pockets! :)
Ok, back to the tutorial…
First I took the two pocket pieces made of main fabric and laid them down on the top upper corners of the skirt front:

Then I pinned in place:

Then I turned the skirt piece over and placed the pocket cut out piece in the top upper corner:

And using a fabric marker or chalk, I outlined the piece:

Then I sewed directly on top of that line on both upper corners:

Then I cut the circle out about 1/4″ away from the line:


And then folded over the pocket to the back and pressed:

Then top-stitch 1/8″ from the curved edge (I know it is hard to see):

Next I took the two contrast pockets and laid them right side down (right side of contrast to wrong side of skirt piece – covering the “hole”):

And pinned pocket to pocket:

(be careful not to pin to skirt – see here how they are just pinned to each other and can be lifted up):

I sewed them together about 3/8″ from edge:

Or one could just serge the edge of the pocket. (I basted them together about 1/4″ from edge and then serged):

I also pinned the pocket to the skirt at the top little bit and on the side as here:

And then basted into place:

Next I took the other skirt piece (the back) and lay it on top of the front skirt piece right sides together (HINT: careful of the print – in this case my print doesn’t have a top/bottom…. but if your print does, then make sure the prints are going the right way!)

Then I pinned both of the short sides together:

Sew/serge both of the short ends together with 0.5″ seam allowance:

Now I had a large loop. When I turn it right side out, it looks like this:

Next on the top of the skirt I marked the mid-point (probably even better is to mark quarter-way points as well, in other words the middle b/n mid-point and side seams) between side seams. Gather the skirt by stitching 1/4″ and 3/8″ inches away from the raw top edge with the longest stitches possible. Do not back stitch at the beginning or and end.
When doing this skirt, I did this twice – once along the front of the skirt and once along the back of the skirt. So I gathered the front and then the back. you can also do it in one long stitch all the way around, but I prefer to gather the front and back separately. Pull on the bobbin thread to gather skirt.


To prepare the waistband:
I folded the elastic in half and sew two raw edges together 1/2″ from end and then I folded the seam allowances down and put a few stitches to keep them in place. This creates a loop:

Also in this picture above you can see that I took the waistband fabric and sew the two short raw edges together 1/2″ from the end. Then I folded it lengthwise in half and pressed.
Then I put the elastic inside the fold of the waistband and pin in place all the way around.

Baste or use a stretch stitch all around just under the elastic making a casing around it.
In this picture you can see that I stitched around the top by the fold as well. This is because I had read that doing this keeps the elastic from flipping or slipping. so I wanted to try it on this skirt:

Then I lined up the half and quarter marks on the skirt and waistband and pinned them right sides together:
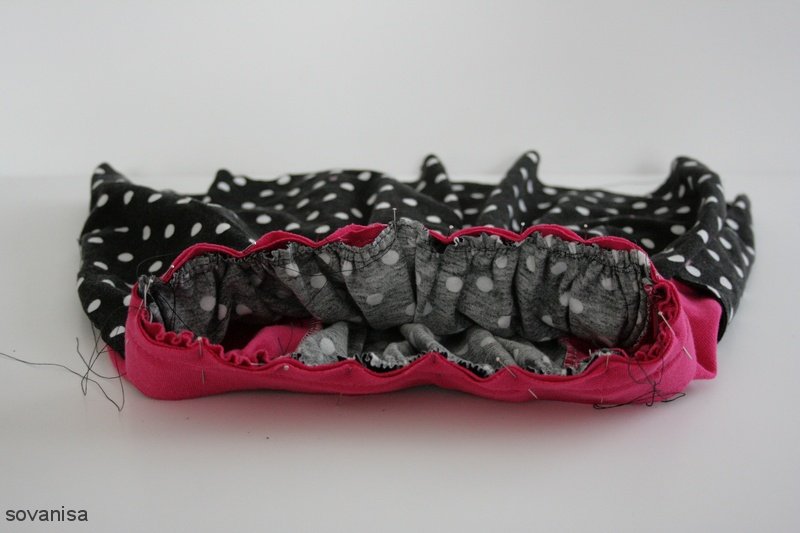
Stitch together with a stretch stitch or use a serger to serge the seams of the waistband and skirt together.
From the inside it looks like this:

From the outside it looks like this:


I like to top stitch just below the waistband so that the seam allowance stays down. It is up to you if you topstitch it or not. (I have made 5 of these skirts so far and 4 of them are topstitched. I decided not to top-stitch one to see how the waistband looks after it is washed. But I didn’t wash it again yet. Will update you on this when I do) I used a stretch stitch about 1/8″ below the seam.
Now all that is left is to hem the skirt.
I folded up the skirt 3/4″ from the bottom and pressed. If you want you could serge the edge, but I didn’t.

Then I used my twin needle to topstitch a double stitch all the way around the hem.

All done :)


0 comments:
Post a Comment